Example
This example shows how to use PyHELP to calculate the monthly water balance for a section of the Rivière du Nord watershed in the Laurentians, Quebec, Canada (see Fig. 3). The study area is about 1160 km² and is divided in a grid of 18 383 cells of 250 m x 250 m. Calculations for the whole area take less than 10 minutes on an Intel i7-7700HQ dual Core @ 2.80GHz.
The input data required to run the calculations are distributed
with each new release of PyHELP as a zip archive on our Releases page.
The input data are also distributed alongside the source code
of PyHELP in the folder example on our GitHub repository.
Note that it is very important that the folder example be saved on your
computer to a location with Write and Read permissions.

Fig. 3 Location map of the study area.
Intialization and execution
The first step is to import and create an instance of the
HelpManager class.
When doing so, we need to pass as argument a path to a working directory.
The working directory is where the input, output and temporary files are read
and saved by PyHELP.
It must be a location where you have Write and Read permissions.
Here, we will use the path to the folder example, which corresponds
to the content of the zip archived that can be downloaded from our
Releases page on GitHub.
The working directory can be set or changed at a later time with the
set_workdir() method.
>>> import os.path as osp
>>> from pyhelp import HelpManager
>>> workdir = "path/to/folder/example"
>>> helpm = HelpManager(workdir, year_range=(2000, 2010))
Reading input data grid data from csv... done
Reading input weather data files... done
During the initialization or when setting a new working directory with
set_workdir(), the HelpManager
automatically looks in the specified directory and loads the geomatics
and weather data from any valid existing input files.
For the purposes of this example, all input data files required for the
calculation in this example are provided in the folder example.
Please read the Data Input section for more details on how
to prepare the input data files manually or with the tools available to
generate these files automatically from one of the supported sources of
existing data.
Once an instance of the HelpManager has been created and
the input data have been loaded successfully, the D4, D7, D10, D11, and D13
input data files need to be generated for each cell of the grid.
These files are the basic input files that are required by the HELP model
to run.
They can be automatically generated from the input grid and weather data with
this command:
>>> helpm.build_help_input_files()
Clearing HELP input files cache... done
Formatting D10 and D11 data for cell 10 of 10 (100.0%)
Task completed in 0.01 sec
Creating D10 input file for cell 10 of 10 (100.0%)
Task completed in 0.99 sec
Creating D11 input file for cell 10 of 10 (100.0%)
Task completed in 0.01 sec
Saving the connectivity tables... done
Generating D4 HELP input files for precip... done
Generating D7 HELP input files for airtemp... done
Generating D13 HELP input files for solrad... done
Updating the connection table... done
Note that by default, these files are saved in the folder help_input_files in the working directory.
We can now use our manager to calculate the monthly water budget for each cell of the grid by doing:
>>> help_output_hdf5 = osp.join(workdir, 'help_example.out')
>>> output = helpm.calc_help_cells(help_output_hdf5, tfsoil=-3)
HELP simulation in progress: 100.0% (0.0 min remaining)
Task completed in 388.95 sec
Post-processing cell 17178 of 17178... done
Saving data to help_example.out... done
The calc_help_cells() method returns a
HelpOutput object that can be used to do various
operations on the data (see the following section).
In addition, because we provided in arguments a file name to the
calc_help_cells() method, the results are saved
automatically on the disk at the specified location in a HDF5 format.
Note also that the results contained in an HelpOutput
object can be saved at a later time to an HDF5 file with the
save_to_hdf5() method.
Previously saved results saved to disk in an HDF5 format can be loaded from the disk by doing:
>>> from pyhelp.output import HelpOutput
>>> output = HelpOutput(help_output_hdf5)
Post-processing and plots
The HelpOutput object can be used to export the
data to an ESRI Shapefile with the following command:
>>>  help_output_shp = osp.join(workdir, 'help_example.shp')
>>>  output.save_to_shp(help_output_shp)
Initialize the shapefile... done
Adding results to the shapefile... done
Saving data to the shapefile... done
The shapefile contains a layer with the average yearly values of each component
of the water budget calculated for each cell of the grid.
In addition, the input data provided in the input_grid.csv are saved
in the shapefile along with the results.
The HelpOutput object can also be used to produce
various plots from the results:
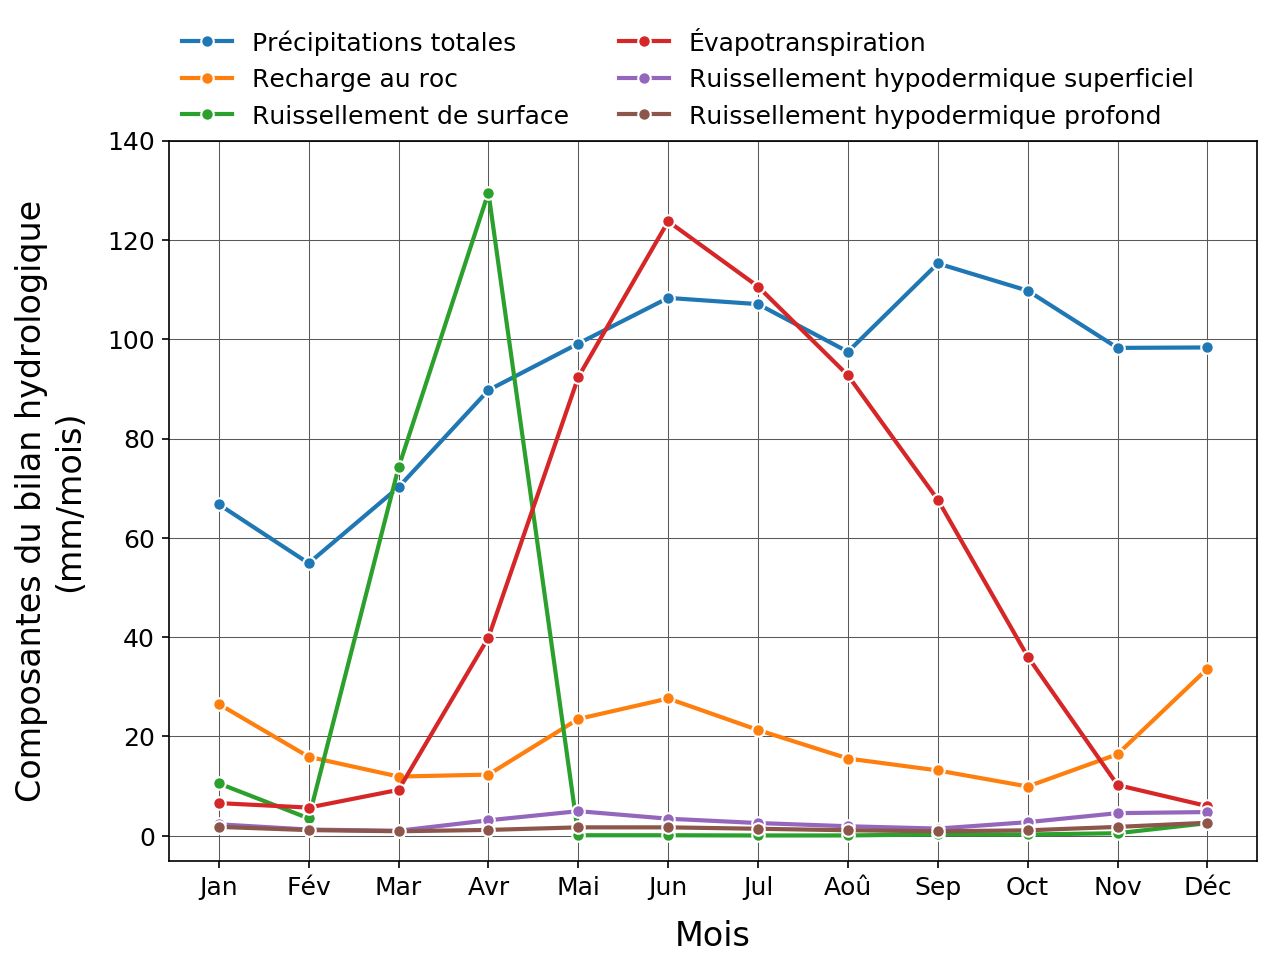
>>> output.plot_area_monthly_avg()
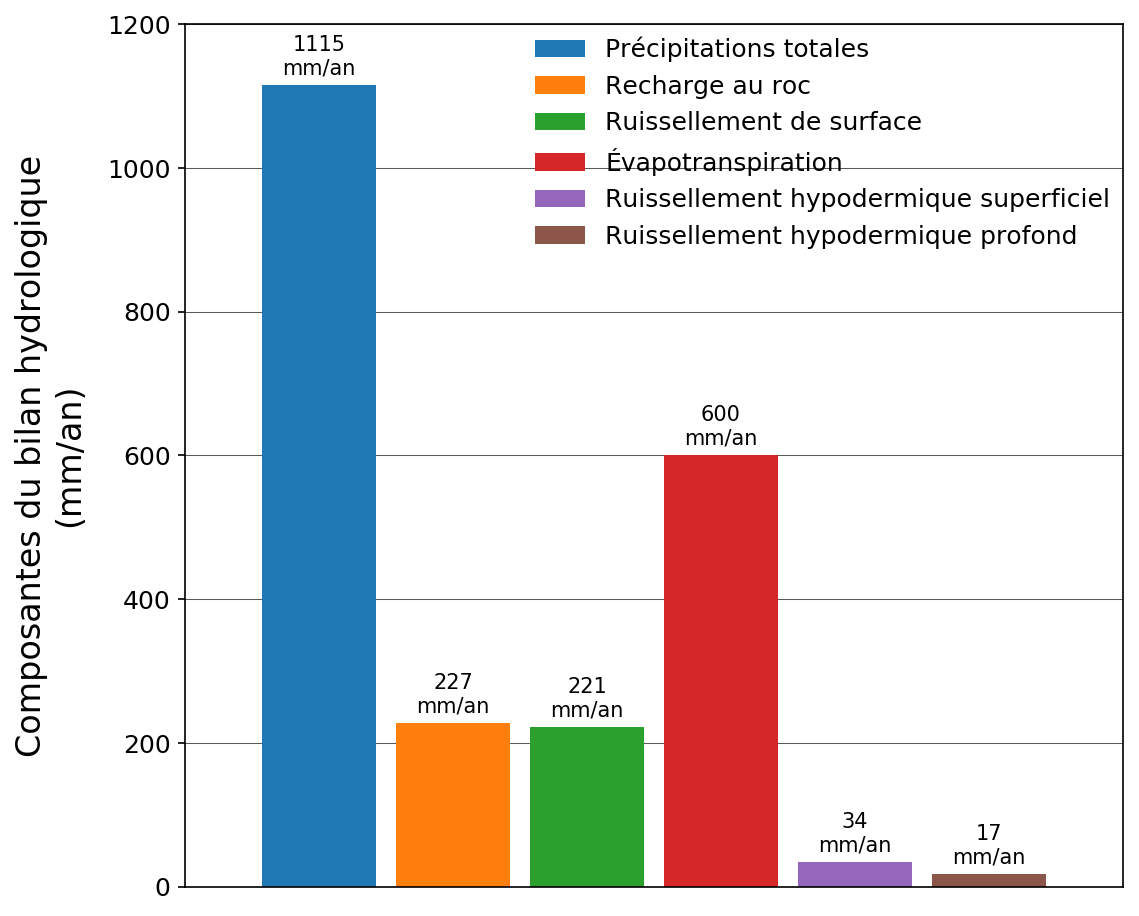
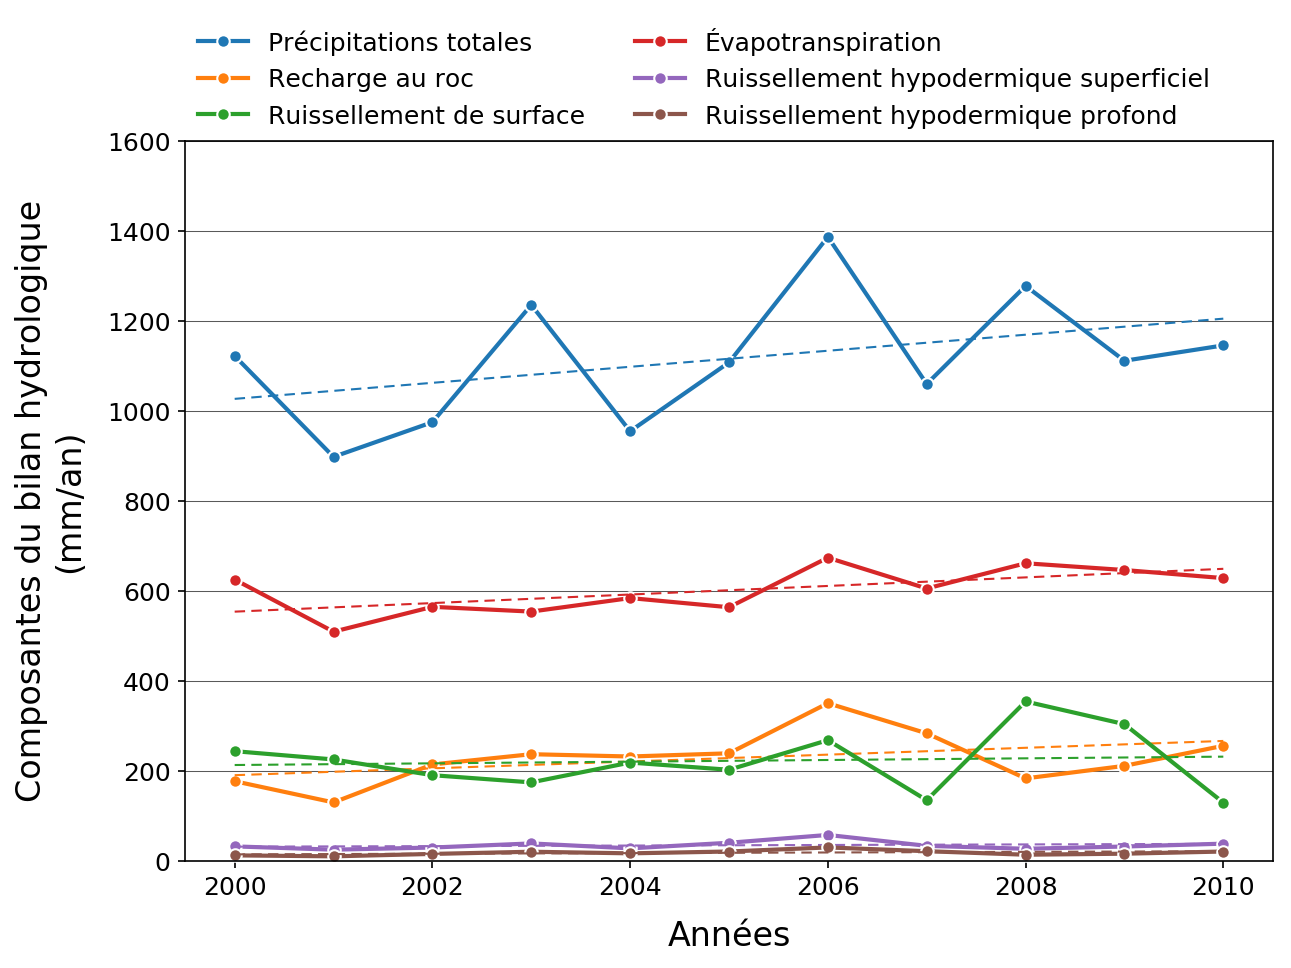
>>> output.plot_area_yearly_avg()
>>> output.plot_area_yearly_avg()
Surface water cells
The monthly water budget for the cells in the grid that are assumed to be
located in surface water bodies (cells with a context value of 0 in
the input_data.csv) is currently not computed by the
calc_help_cells() method.
Instead, the yearly water budget can be calculated for these cells
by doing:
>>> evp_surf = 650
>>> surf_output_hdf5 = osp.join(workdir, 'surf_example.out')
>>> output_surf = helpm.calc_surf_water_cells(evp_surf, surf_output_hdf5)
Calculating budget for water cells... done
Task completed in 0.02 sec
The calc_surf_water_cells() method returns a
dictionary with yearly values of the water budget components for every cell
of the grid that is assumed to be located in surface water bodies.
In addition, if a path to a filename is provided, the results will be save
automatically to the disk in a HDF5 file.
Warning
This feature will undergo major changes in future versions. Please consult PyHELP Issue #10 to follow our progress on this topic.